
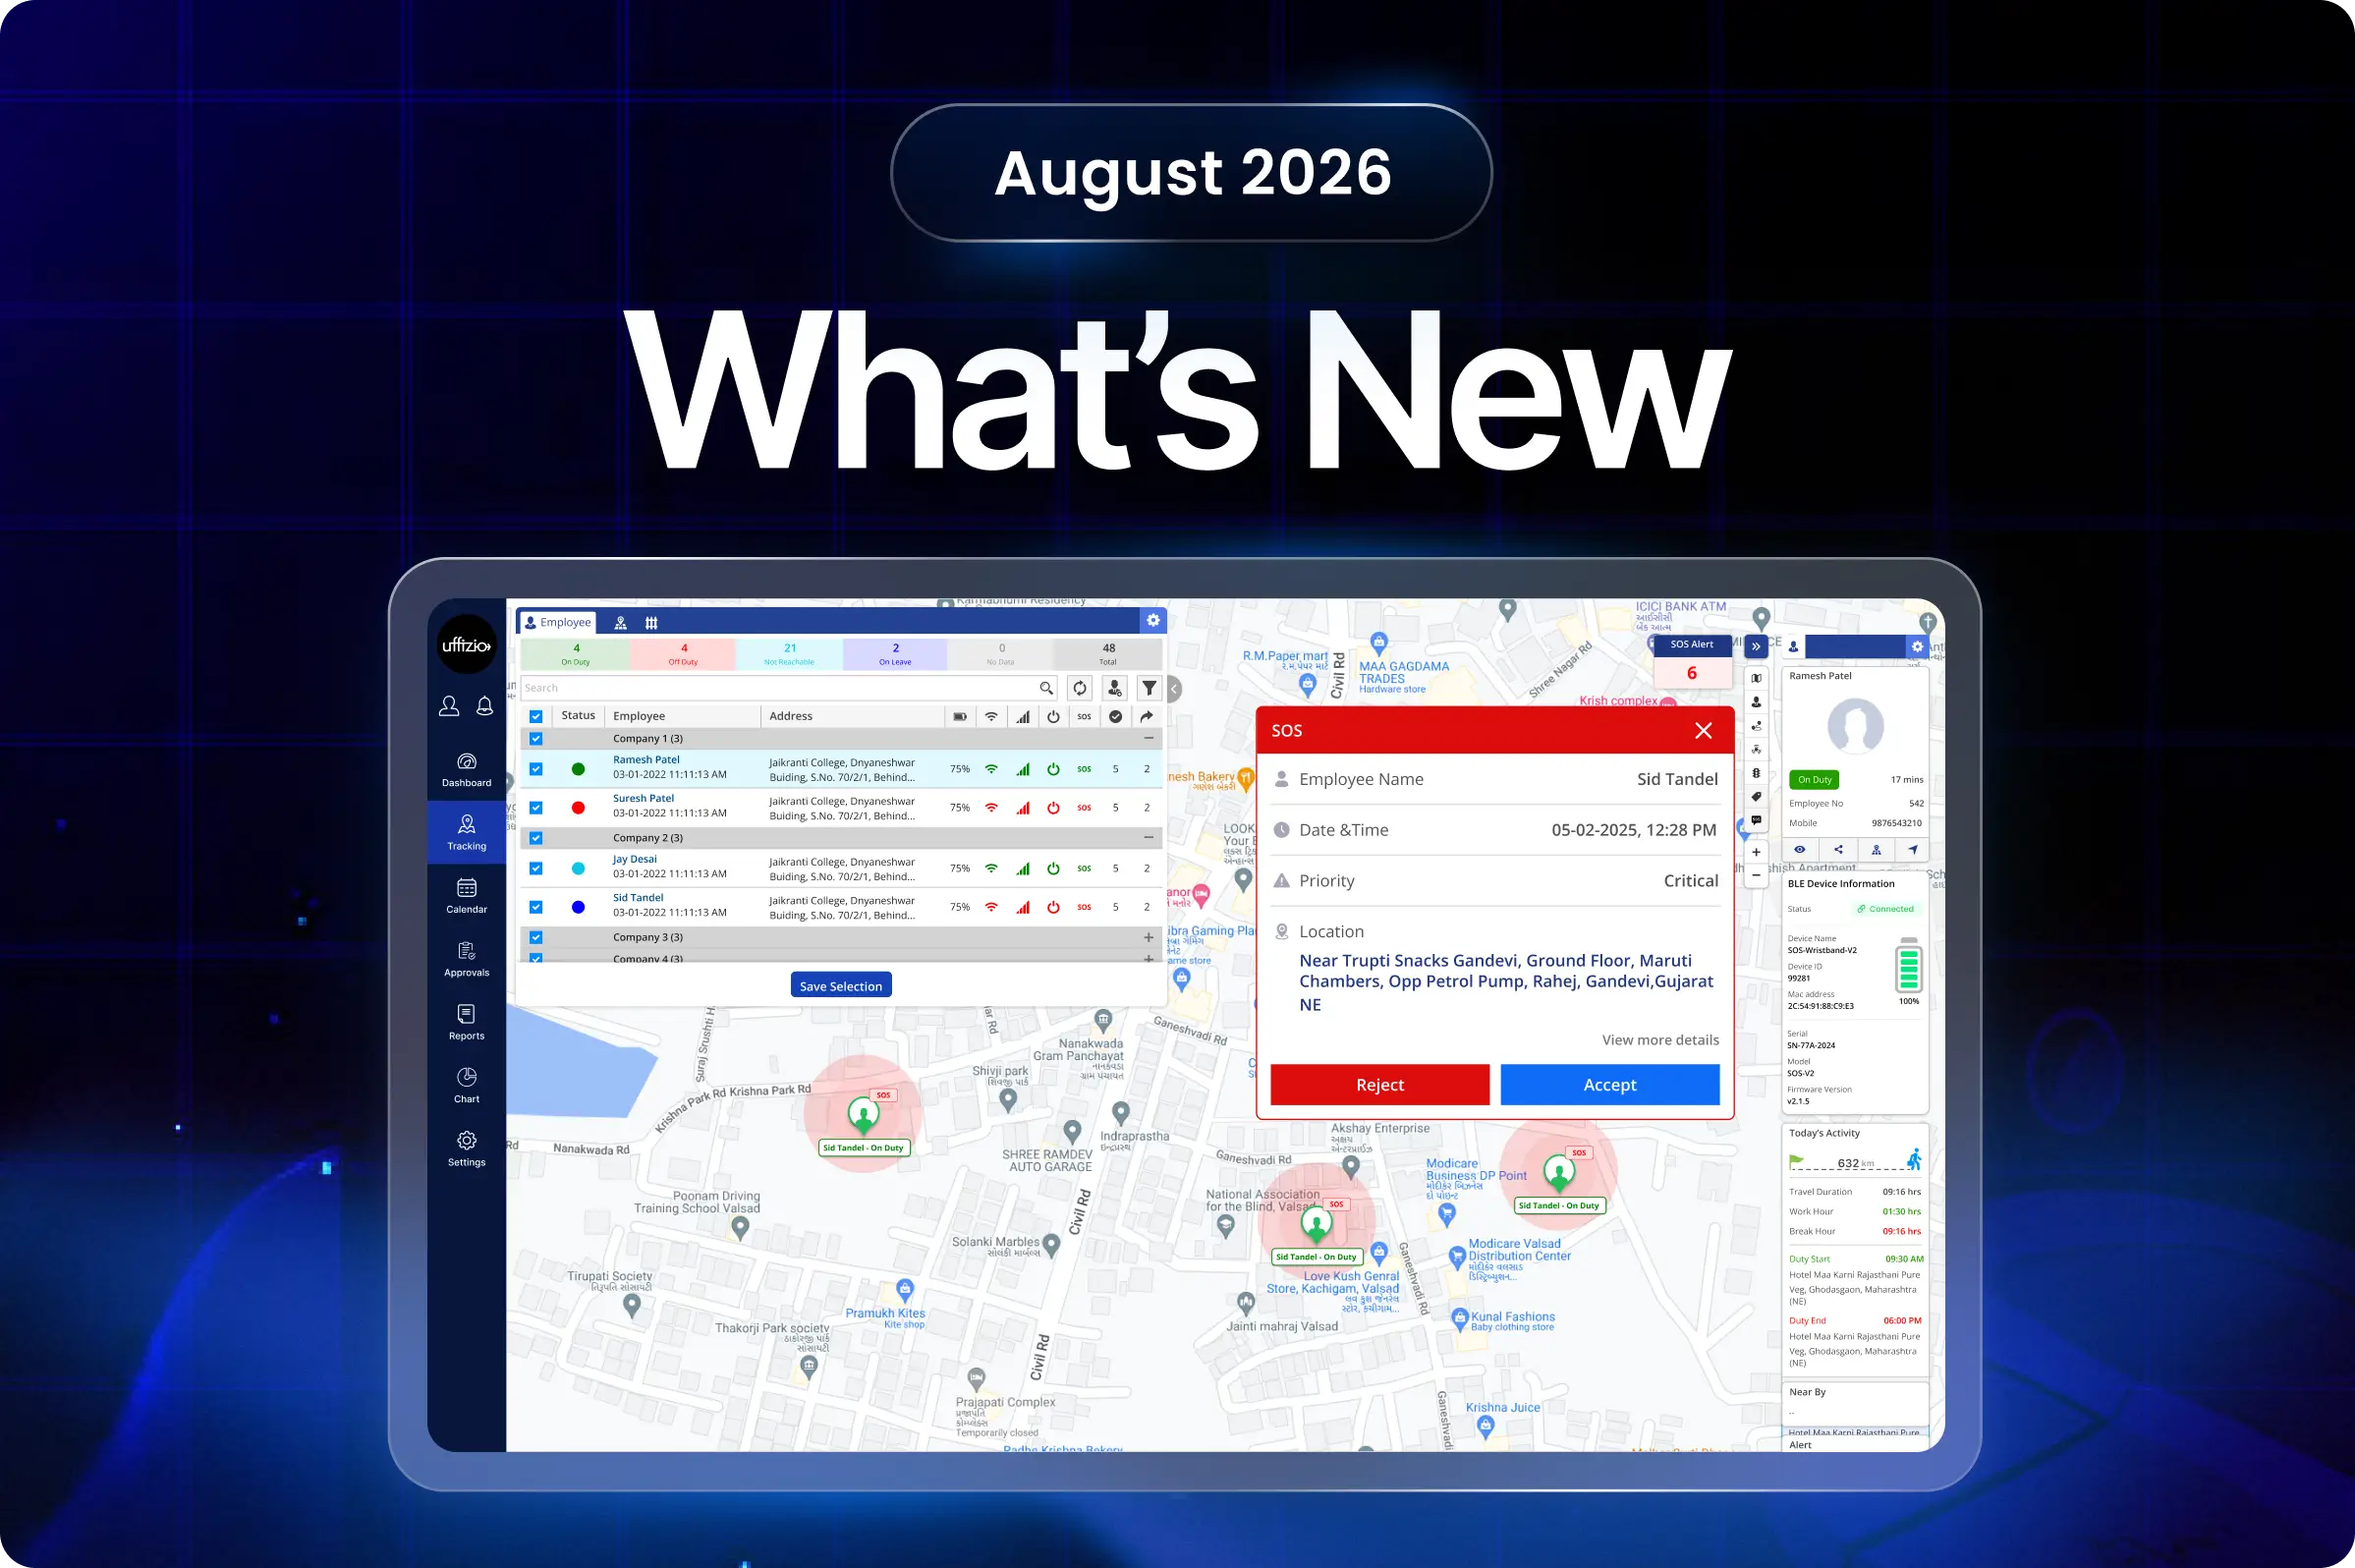
August brings a powerful set of TaskEye product updates introducing new ways to monitor, manage, and simplify field workforce operations. From clearer journey tracking and real-time SOS visibility to smarter workforce reports and mobile-first workflows, managers gain more control across daily operations. This month also introduces new mobile application capabilities that also make leave, QR codes, odometer capture, and employee status easier to manage.
Additionally, new odometer controls and dynamic task contact details also simplify everyday field workflows. Explore the latest product enhancements built to improve workforce visibility, reduce operational effort, and keep field teams better connected, accessible, and easier to manage.
TaskEye Güncellemeleri
1. Analyse employee journeys with clearer routes & travel speed
The Playback Report previously lacked a journey route matching the Tracking screen and did not calculate speed between location points.
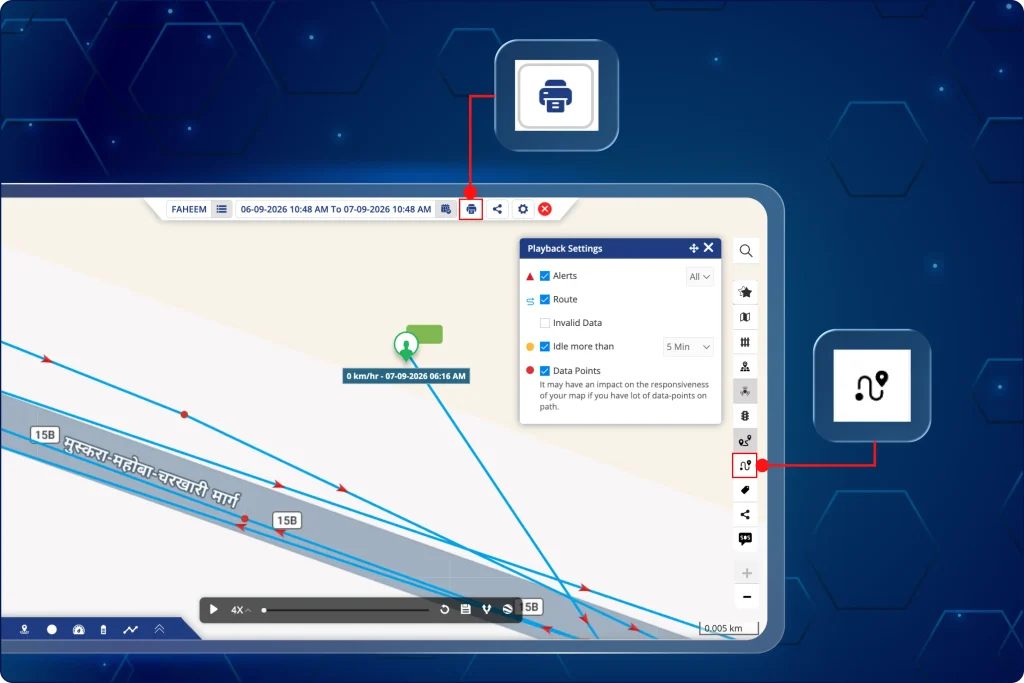
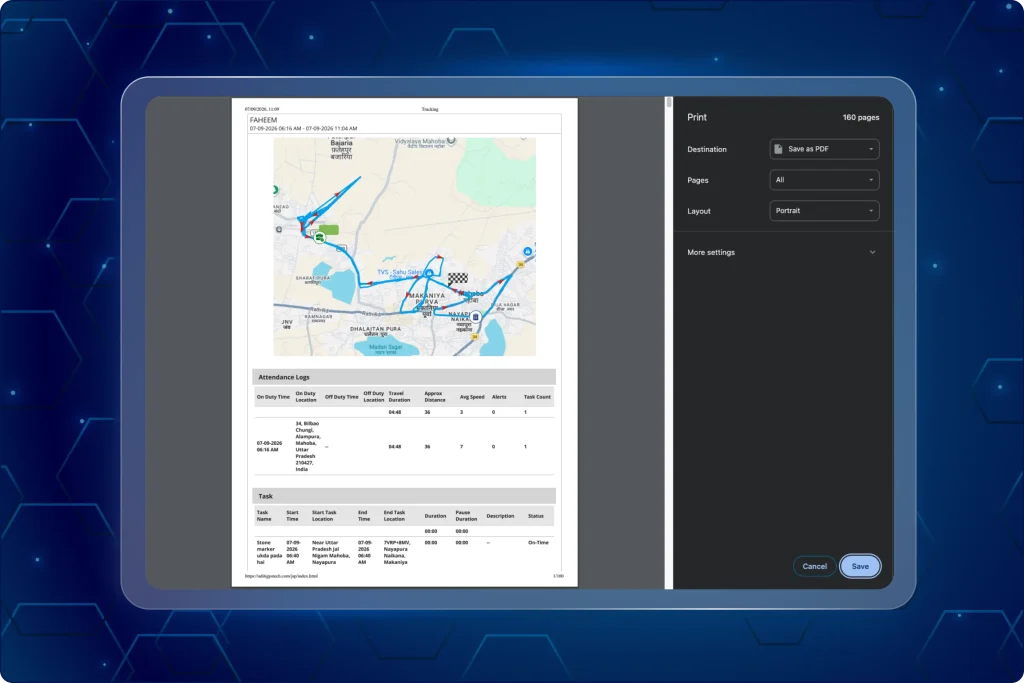
Managers can now review the travelled route and speed details together in the Playback Report. The enhanced report now highlights the travelled route and provides travel speed and average speed for clearer movement analysis (as seen in image 1 and 1.1).
Yöneticiler şimdi ne yapabilir?
- See the average speed for the complete journey.
- View travel speed between consecutive location points.
- View the highlighted journey route on the Playback map.
- See the route in the same format as the Tracking screen.
- Include the highlighted route in the journey report section.
- Include route and speed details in printed and exported reports.
Key benefits of this update:
- Provides average speed for the complete journey.
- Makes travelled routes easier to review in reports.
- Helps analyse movement between consecutive location points.
- Provides a consistent journey view across Tracking and Playback.
- Keeps route and speed details available in printed and exported outputs.
2. Add leave details directly from the manager app
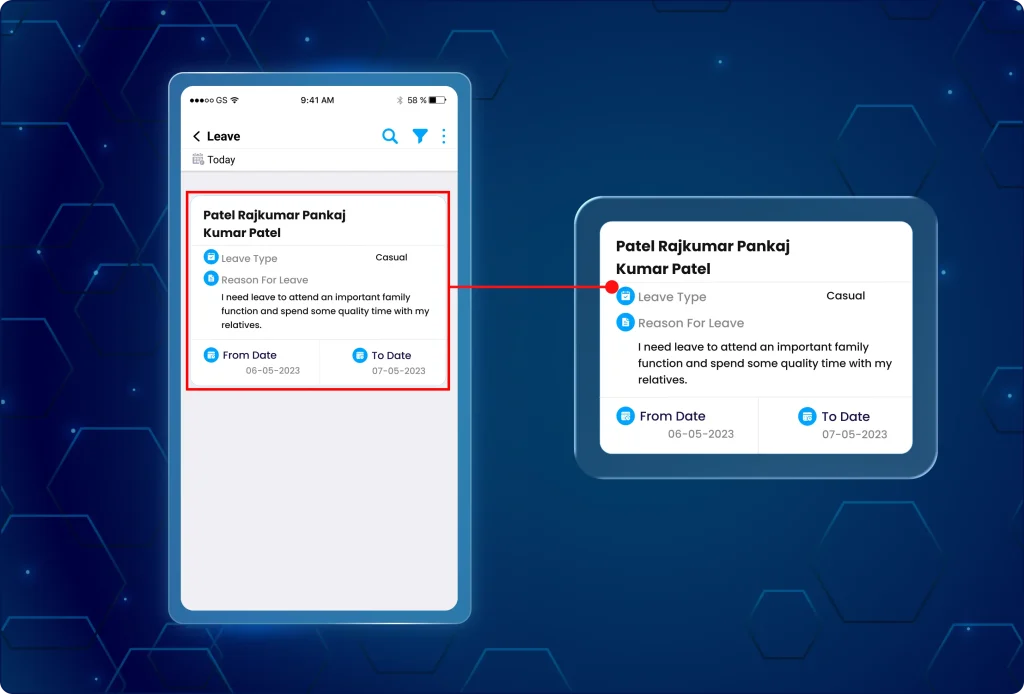
Managers previously could not create leave records from the Manager App, while the web application already supported the function. The leave list also lacked department information (as seen in image 2 below).
O Yönetici Uygulaması now supports leave creation with the same fields and behaviour as the web application, while the leave list shows the employee’s department. It allows field managers to create leave records and view department details directly from the Leave overview.
Yöneticiler şimdi ne yapabilir?
- Use the add action to create a new leave record.
- Submit leave requests with mandatory field validations.
- View the employee’s department in the leave overview.
- Leave creation is available from the main leave overview.
- Leave cancellation remains available only through the web portal.
- See the Department column immediately after the employee column.
- Complete the leave detail form with the same fields and behaviour as the web application.
- Access newly created leave records consistently across the Manager App and web portal.
Key benefits of this update:
- Maintains mandatory information through field validation.
- Improves leave list visibility with employee department information.
- Keeps leave data consistent across the Manager App and web portal.
- Keeps leave cancellation controlled through the existing web portal workflow.
- Enables managers to create leave records without relying on the web application.
3. Identify active SOS alerts faster with live map indicators on the tracking screen
Active SOS alerts previously had no visual indication on the Tracking Screen, making emergency events harder to identify from the map.
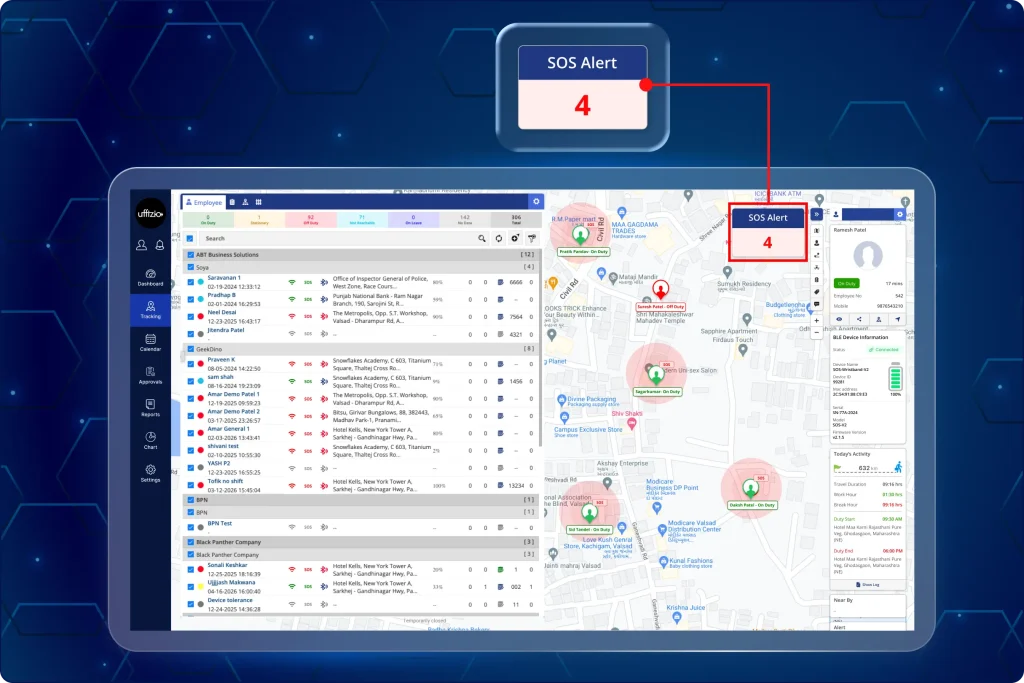
The enhanced Tracking Screen now shows active SOS counts, pulse animations, and filtered employee lists. Managers can now see active SOS alerts directly on the map and quickly identify the employees associated with them (as seen in image 3 and 3.1).
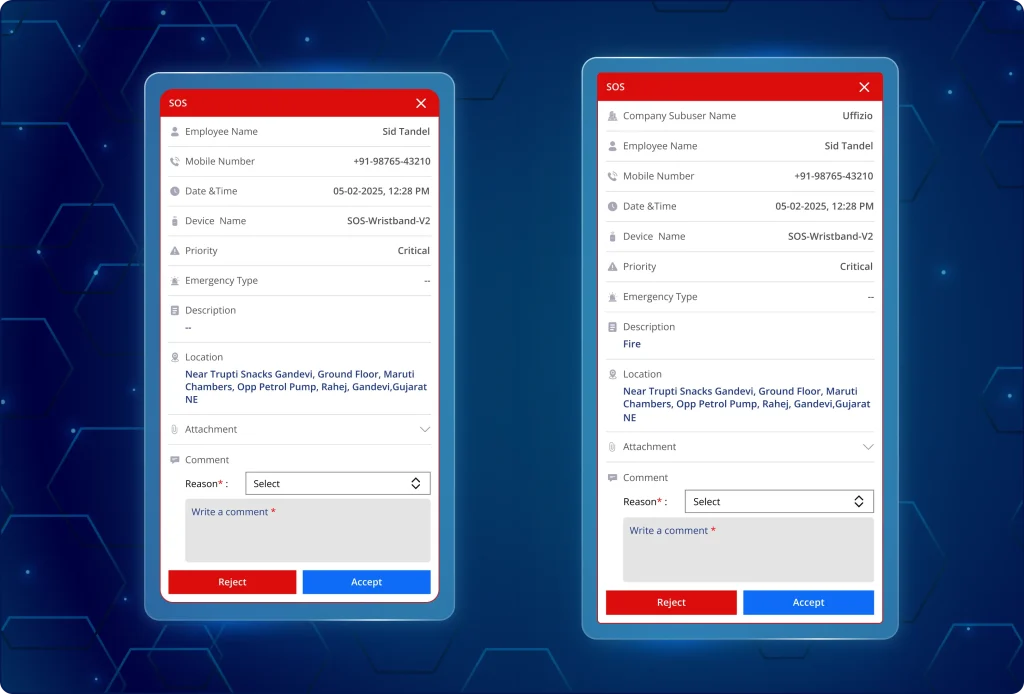
Consequently, the SOS alert raised from the TaskEye çalışan uygulaması and the BLE device also appears as a live alert on the tracking screen. When the SOS alert is active, the employee’s location is highlighted with a pulse animation.
Yöneticiler şimdi ne yapabilir?
- Click the sos count to view all active emergency alerts.
- View the total count of active SOS alerts on the tracking screen.
- See a pulse animation at each employee’s location for active SOS alerts.
- See the SOS count update instantly when single or multiple alerts are raised.
- Automatically filter the employee list to show employees with active SOS alerts.
- View multiple pulse animations when SOS alerts are active for multiple employees.
- Update the SOS status as true or false and provide a mandatory reason in the sos alert section.
- Return the employee list and map screen to their normal applied filters after an SOS is acknowledged or resolved.
Key benefits of this update:
- Makes active emergency alerts immediately visible on the map.
- Helps managers locate employees who have raised SOS alerts.
- Provides a consolidated view when multiple SOS alerts occur.
- Reduces the effort needed to identify affected employees during emergencies.
- Captures the company subuser name, employee name, device name, and mandatory SOS description in the details section.
- Ensures SOS alerts remain visible until managers update their status with a reason.
4. Monitor bluetooth low energy (BLE) alert activity from reports & dashboard
Previously, managers had no dedicated report or dashboard view for monitoring BLE device activity, SOS alerts, status, and usage. The new BLE Report and Dashboard Widget centralise SOS activity, device information, evidence, call history, and verification details.
4.1 Review BLE alert activity in detailed reports
Managers can now review employee SOS activity through a dedicated report with filters for company, branch, department, employee name, and date or date range.
What can managers review?
- SOS type values such as SOS and BLE devices.
- Event date & time, reason, and comment for each alert.
- Call connected status, call duration, and sos verification status.
- Call statuses including connected, missed, failed, busy, and no answer.
- Company, branch, department, and number of sos triggers in the summary view.
- device name, custom SOS id, employee code, SOS type, category, severity, and type.
- Location, description, audio evidence, and image evidence for each SOS event.
Additionally, managers can review call history for each SOS event, including from number, to number, event time, duration, and status. The call history shows all relevant call attempts based on which contact was answered or whether no call connected.
4.2 Monitor BLE SOS alerts from the dashboard
The new BLE SOS alert widget provides a dashboard view of BLE SOS activity with filters for today, this week, last week, and last month.
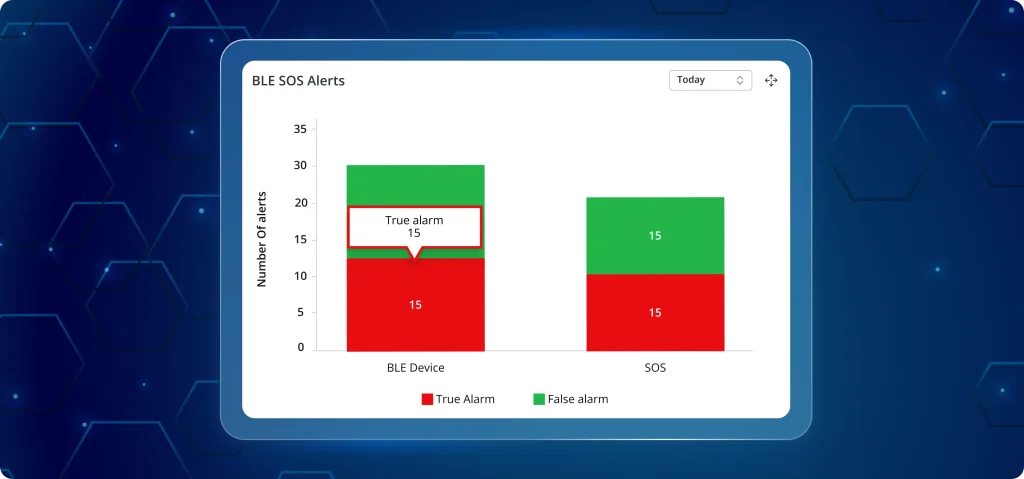
What can managers review?
- Event date & time for BLE SOS alerts.
- SOS verification status for each alert.
- Detailed SOS information including employee, device, address, sos type, and verification status.
Key benefits of this update:
- Centralises BLE SOS information for faster operational review.
- Reduces the effort needed to trace alert details and call activity.
- Provides clearer visibility into SOS verification and response outcomes.
- Keeps supporting evidence, location, and communication records available for review.
- Helps managers identify BLE SOS activity across different time periods.
- Supports quicker investigation through detailed alert and call-history information.
5. Manage QR codes directly from the manager app
Previously, QR code viewing and generation were available only through the web application. Managers can now review, download, search, share, and generate QR codes with ease. They can access generated QR code records in a tabular grid within the Manager App.
Yöneticiler şimdi ne yapabilir?
- View QR code records with QR text fixed on the left while other columns scroll horizontally.
- Download an individual QR code directly from its record.
- Download all listed QR codes together as a single consolidated pdf.
- Search QR code records using qr text to quickly find specific entries.
5.1 Create new QR codes from the manager app
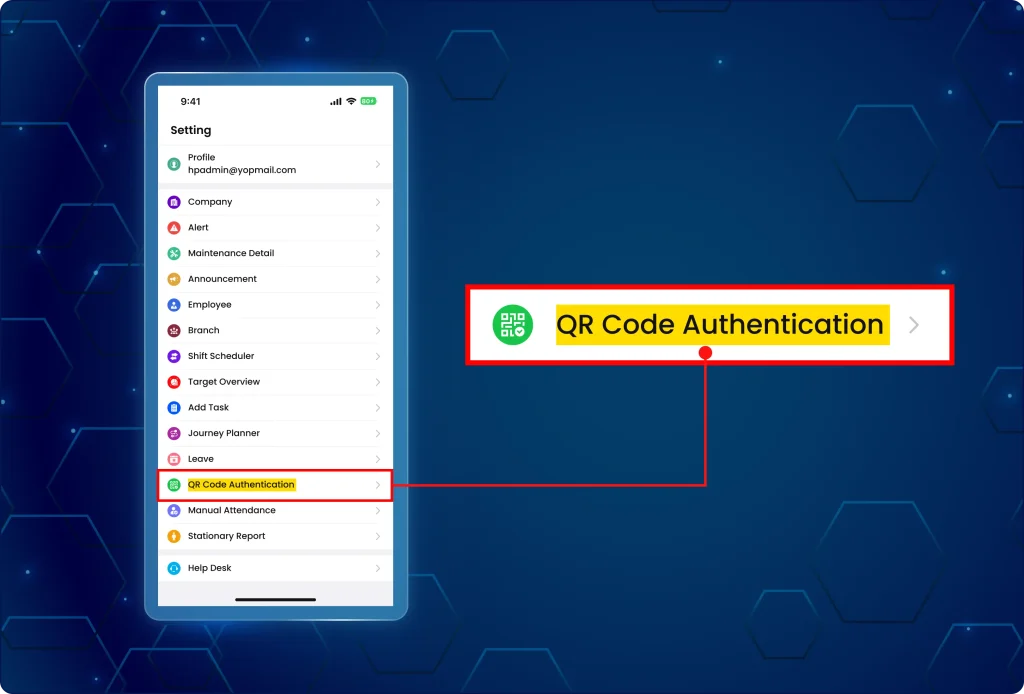
Managers can now create QR codes through a dedicated form that follows the web application’s QR creation experience (as seen in image 5.1 below).
Mobil uygulamada neler değişti?
- Open the QR creation screen using the add (+) option.
- Enter QR text and description when creating a QR code.
- Display hierarchy fields based on the logged-in user’s access level.
- Enforce company and QR text as mandatory fields before submission.
- Show the admin dropdown for super admin users and company dropdown for reseller users.
- Hide hierarchy dropdowns for company-level users and directly display the QR text field.
- Generate the QR code after a successful save and immediately add it to the overview list.
Key benefits of this update:
- Access QR code records without relying on the web application.
- Find specific QR codes faster through QR text search.
- Download individual or consolidated QR codes when required.
- Create new QR codes while working from the manager app.
- Maintain consistent QR code management across the manager app and web application.
- Apply hierarchy-based access and mandatory field validation during QR creation.
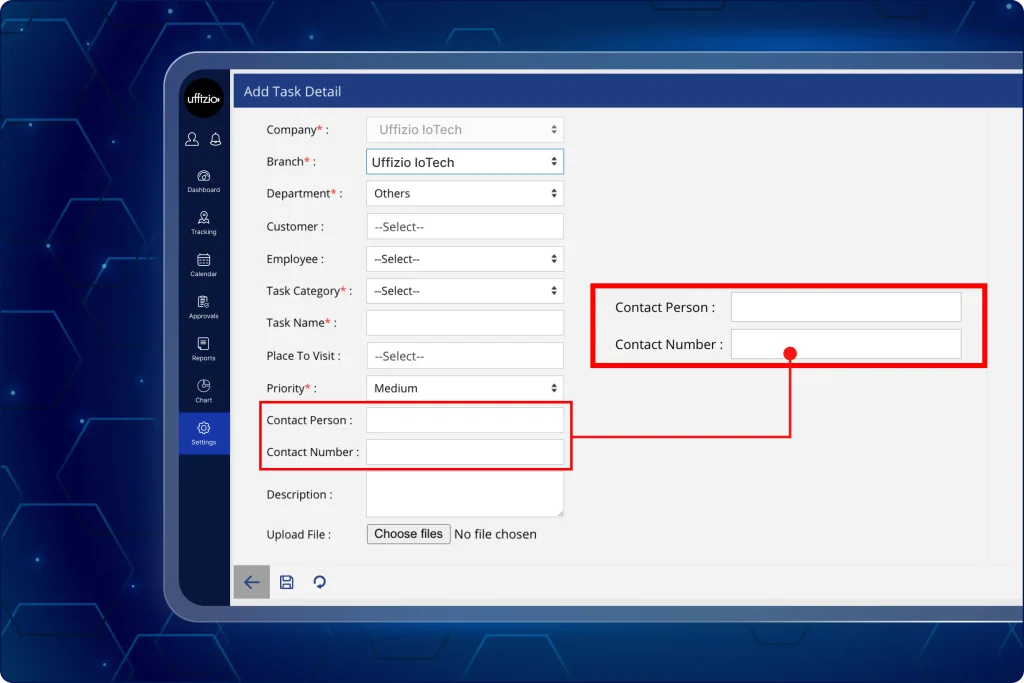
6. Auto-fill contact details from customer or POI while creating task
Previously, contact person and contact number were populated only from the selected place to visit (poi).
Managers can now create tasks by assigning customers with their contact details and visit address. The task screen now fetches contact details from either Customer or POI based on the most recent selection (as seen in image 6 below).
Yöneticiler şimdi ne yapabilir?
- Override the fetched contact information before saving the task.
- Select a place to visit (POI) to auto-fill both fields from the POI profile.
- Use the updated task screen with the applicable language translation.
- Manually edit contact person and contact number after the system populates them.
- Select a customer to auto-fill contact person and contact number from the customer profile.
- Switch between customer and poi selections, with the latest selection automatically replacing the existing contact details.
Key benefits of this update:
- Gives managers control to correct or customize automatically populated details.
- Extends automatic contact population beyond the previous POI-only behaviour.
- Reduces manual entry when creating tasks with existing customer or POI contacts.
- Keeps contact details aligned with the most recently selected task location or customer.
- Prevents outdated contact information from remaining after a selection changes.
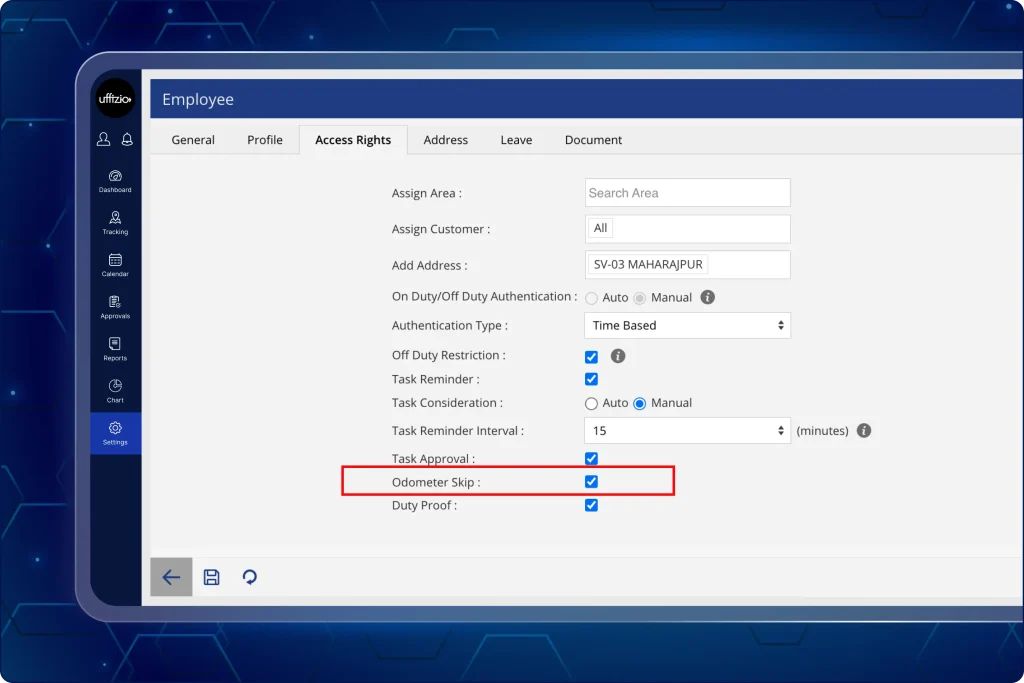
7. Give eligible employees more flexibility with odometer skip
Previously, employees had to submit an odometer reading whenever odometer capture was enabled for their department. The new odometer skip permission lets selected employees bypass this requirement when they use alternative transportation.
7.1 Allow employees to skip odometer reading captures
Managers can now configure odometer skip individually for employees while retaining company-level odometer rules (as seen in image 7.1 below).
Yöneticiler şimdi ne yapabilir?
- Enable the Odometer Skip checkbox for specific employees, keeping the permission unchecked by default.
- View the setting only when odometer capture is configured at the company level.
- Open a Departments modal from the Employee screen to view the complete selected department list in read-only mode.
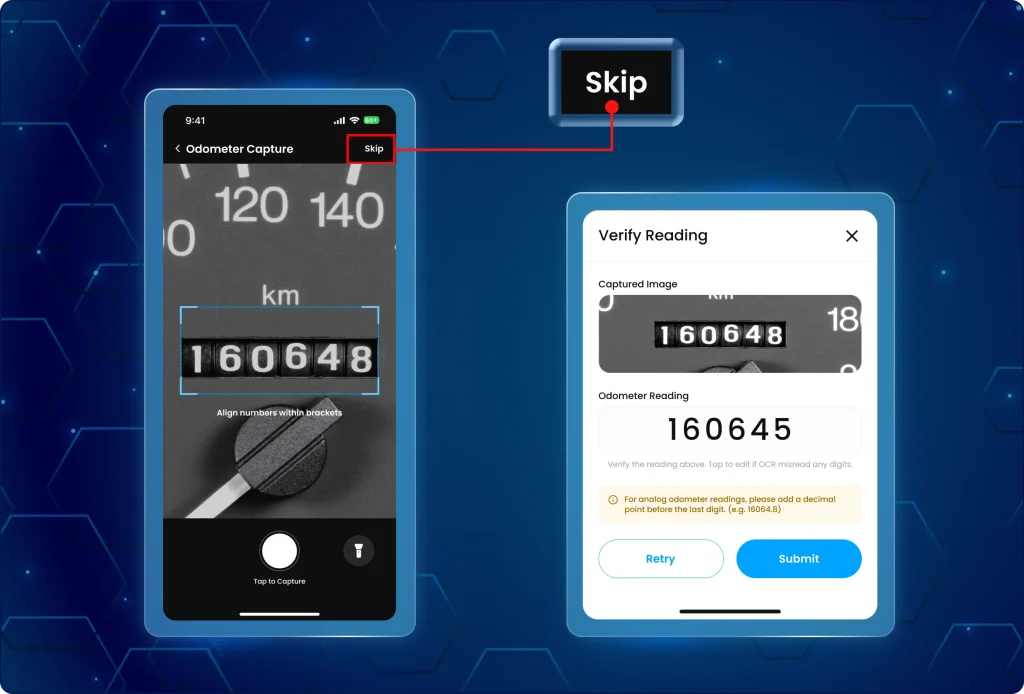
7.2 Allow employees to skip odometer capture during on duty
Eligible employees can now bypass odometer capture when completing their On Duty punch.
What has changed on the employee app?
- Show a skip option on the odometer capture screen when odometer skip is enabled (as seen in image 7.2 below).
- Complete the on duty event directly when the employee selects skip.
- Bypass both odometer reading and image capture when skip is used.
- Keep the current mandatory odometer behaviour when the permission is disabled.
7.3 Apply the correct odometer requirement at off duty
The Off Duty odometer requirement now depends on what happened during the employee’s On Duty punch.
Odometer configuration during off duty status
- Skip the odometer capture screen completely if the employee skipped odometer capture during On Duty.
- Show the Off Duty odometer screen when an employee enters an On Duty odometer value.
- Requires a closing odometer reading when an opening reading was provided.
7.4 Show skipped odometer entries in the employee attendance reports
Attendance reports now clearly identify when an employee bypassed odometer capture. The report displays “Skipped” in the applicable odometer columns when the skip option was used during On Duty.
Key benefits of this update:
- Gives selected employees flexibility when alternative transportation makes odometer capture impractical.
- Maintains mandatory odometer controls for employees without the skip permission.
- Keeps On Duty and Off Duty odometer requirements consistent with the employee’s attendance action.
- Makes skipped odometer entries clearly identifiable in Attendance reports.
- Provides clearer visibility of selected departments when reviewing employee configurations.
8. Monitor employee status directly from the home screen
Previously, managers had to open the Yönetici Uygulaması to check employee status.
The new employee status home-screen widget allows managers to quickly check the employee activity status without logging in the app.
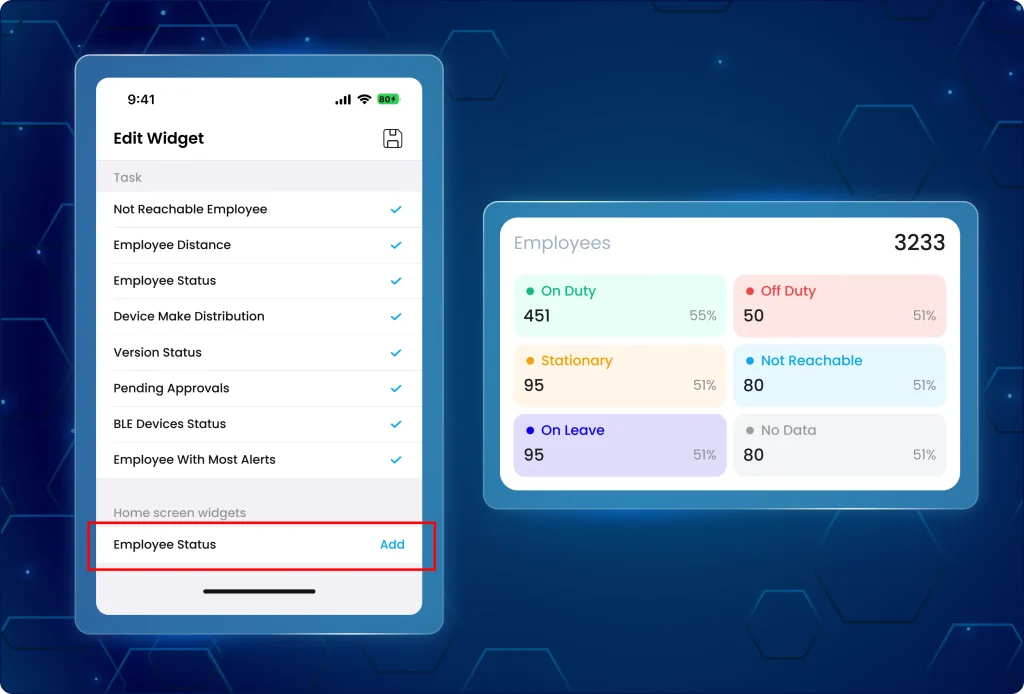
8.1. Add the employee status widget from the manager mobile app
Managers can now find and add the employee status widget through the edit widget screen (as seen in image 8.1 below).
Yöneticiler şimdi ne yapabilir?
- Access a new Home screen widgets section within the Edit Widget.
- Select Employee Status and use the Add option to start widget installation.
- On Android, trigger the native widget pinning flow directly from the Add action.
- On iOS, view a modal titled “Add your widget to the home screen” with numbered installation instructions.
- Follow iOS instructions for manually placing the widget through home-screen edit mode.
- View white labelled instructions where the deployed application’s branded name appears dynamically.
- Use “Go to Home Screen” to minimize the app and return directly to the device home screen.
8.2. What can managers view from the employee status widget?
The home-screen widget mirrors the Employee Status information available in the Manager App.
The widget shows:
- Real-time Employee Status data matching the in-app dashboard card.
- A vertical list that adapts to supported widget sizes.
- On Duty
- Stationary
- Off Duty
- On Leave
- Not Reachable
- No Data
- A matching colour indicator and status name for every status.
- A direct link to the employee status dashboard widget when the home-screen widget is tapped.
Key benefits of this update:
- Gives managers quick employee status visibility without opening the Manager App.
- Reduces the steps needed to check current workforce status.
- Keeps home-screen information aligned with the in-app Employee Status data.
- Supports consistent widget installation across Android and iOS.
- Preserves branded app identity in white labelled iOS installation instructions.
- Provides direct access to detailed Employee Status information when required.
9. Track employee stoppages with a dedicated stationary report
Previously, TaskEye had no dedicated report for identifying employee stoppages during working hours. The new stationary report records genuine stationary periods while excluding time spent actively performing tasks (as seen in image 9.1 below).
9.1 Analyse stationary events across employee activity
Managers can now review stationary events from both the Web Application and Manager App using familiar report filters.
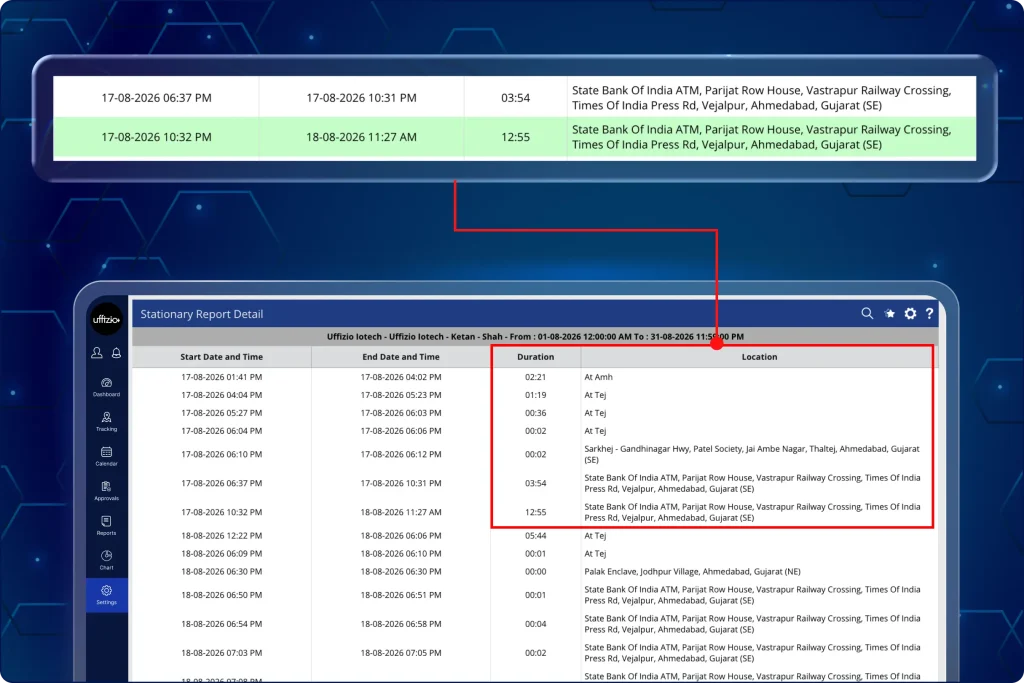
Yöneticiler şimdi ne yapabilir?
- Filter records by company, branch, department, date, and employee.
- Identify stationary periods based on the predefined stationary duration.
- Use task consideration in the web application to account for task activity.
- Export stationary report data using the existing report export functionality.
- View a first-level summary with company, branch, department, employee name, and number of stationary events.
- Review individual stationary events with start date and time, end date and time, duration, and location.
- Exclude task-active periods so time spent performing a task is not counted as a stationary event.
9.2 Review stationary employee details in the manager mobile app
The stationary report is also available in the Manager App with the existing report filtering and drill-down structure (as seen in image 9.2 below)..
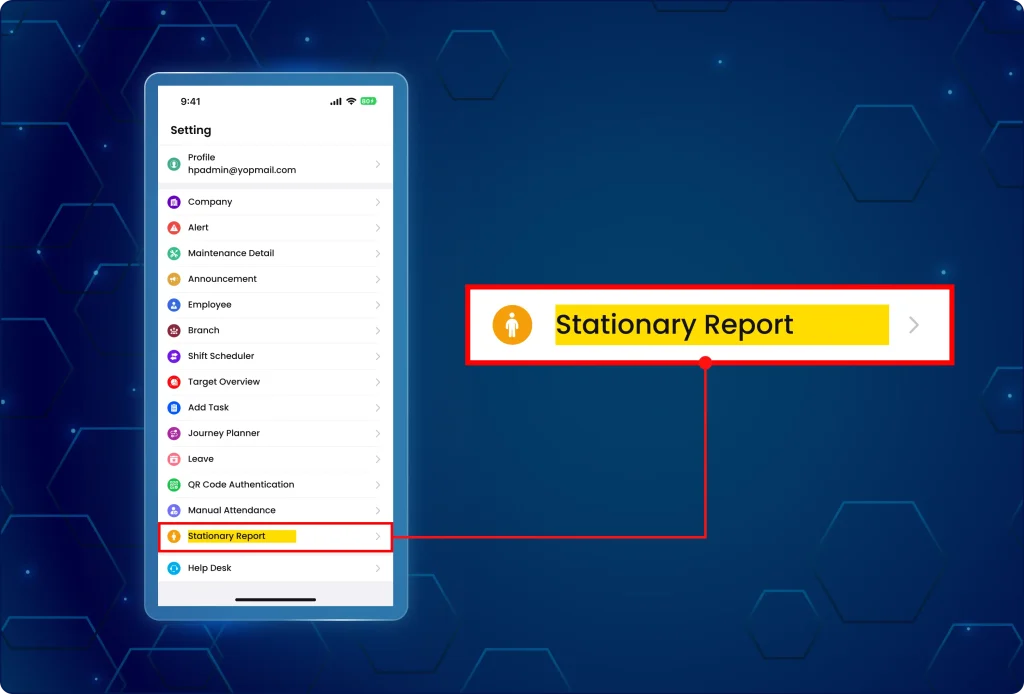
What can managers review?
- Stationary events based on the predefined duration during working hours.
- Company, Branch, Department, Employee Name, and Number of Stationary events in the first layer.
- Start Date and Time, End Date and Time, Duration, and Location in the second layer.
Key benefits of this update:
- Provides dedicated visibility into employee stoppages during working hours.
- Supports easier analysis through existing filters and report export capabilities.
- Separates genuine stoppages from periods spent actively performing tasks.
- Helps managers identify and analyse stationary patterns by employee and location.
- Makes stationary activity available through both web and mobile management interfaces.